


| Categories | Agricultural Equipment and Harvesting Machinery Manuals, New Holland Agricultural Equipment Manuals |
|---|---|
| Download File |
|
| Document File Type | |
| Copyright | Attribution Non-commercial |
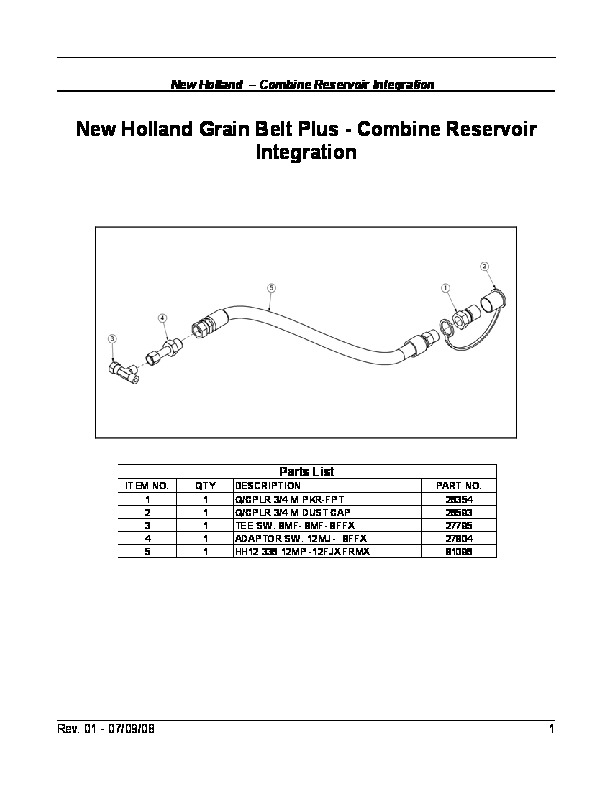
New Holland Combine Hydraulic Reservoir Integration Instructions New Holland Combine Reservoir Integration New Holland Grain Belt Plus – Combine Reservoir Integration Parts List ITEM NO. 1 2 3 4 5 QTY 1 1 DESCRIPTION Q/CPLR 3/4 M PKR-FPT Q/CPLR 3/4 M DUST CAP TEE SW. 8MF- 8MF- 8FFX ADAPTOR SW. 12MJ – 8FFX HH12 336 12MP -12FJX FRMX PART NO. 26354 26593 27795 27804 81096 Rev. 01 – 07/09/08 1 New Holland Combine Reservoir Integration Preparation Check the contents of the kit to ensure you have received all the correct parts, and everything is in good condition.
Agricultural Equipment Manual Free Download. Lawn Mowers Specs. Power Harvesting Machinery Free Specification Download PDF.
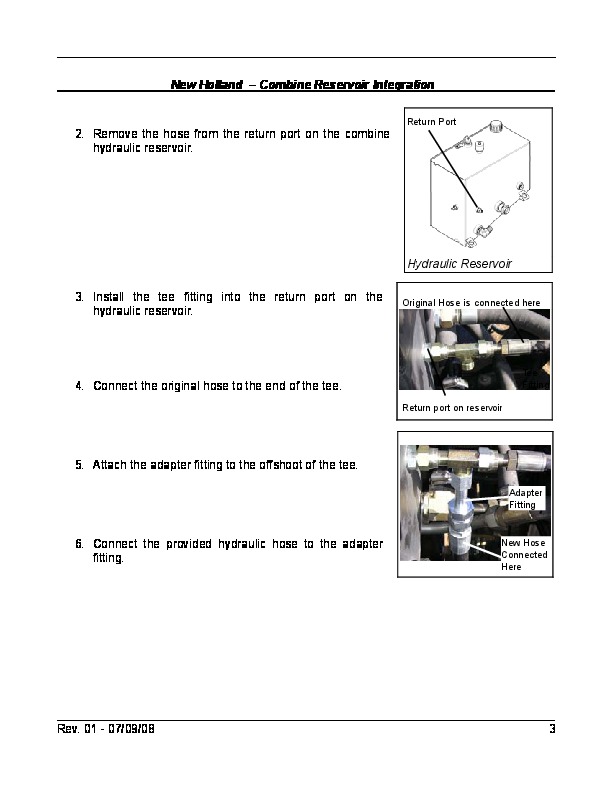
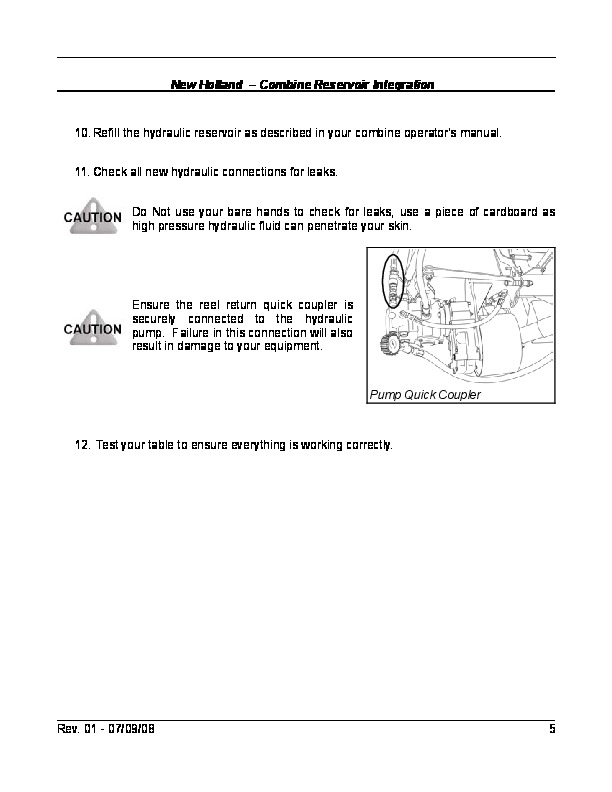
In this procedure, All the hydraulic fluid needs to be drained from the combines reservoir. This is a large volume of oil, in order to keep as much of it in the system as possible, fully extend all hydraulic cylinders so that they each act as a small reservoir. Tilt the table forward, open the trap door under the finger auger. Fully raise and extend the reel, secure the locks on the reel lift cylinders to prevent the reel from falling. Lift the table off the ground, lock in place, and extend the combine auger. Familiarize yourself with the parts and these instructions before starting work on the installation. Use teflon tape on the quick coupler fitting to ensure a good seal. Be sure to turn off the combine and wait for all moving parts to come to a complete stop before exiting the cab. Directions For the purposes of this manual, front refers to the cutter bar portion of the header, rear refers to the combine mount side, and left and right are as seen when standing at the rear facing the front. Installation 1. Drain the oil from the combine hydraulic reservoir until the level drops below that of the return port. See your combine operator’s manual for details on draining the hydraulic reservoir. Hydraulic Reservoir Location Rev. 01 – 07/09/08 2 New Holland Combine Reservoir Integration Return Port 2. Remove the hose from the return port on the combine hydraulic reservoir. Hydraulic Reservoir 3. Install the tee fitting into the return port on the hydraulic reservoir. Original Hose is connected here 4. Connect the original hose to the end of the tee. Return port on reservoir Tee Fitting 5. Attach the adapter fitting to the offshoot of the tee. Adapter Fitting 6. Connect the provided hydraulic hose to the adapter fitting. New Hose Connected Here Rev. 01 – 07/09/08 3 New Holland Combine Reservoir Integration 7. Run the hose along the existing hydraulic lines. Continue to the front of the combine, securing with zip-ties along the way. Do not route the hose along any location where it may become damaged through contact with moving parts. Hydraulic Hose Routing Hose 8. Slide the base of the end cap over the hose. Wrap the end of the hose with teflon tape and screw on the quick coupler fitting. Teflon Tape Quick Coupler Fitting End Cap Quick Coupler Assembly 9. The hose plugs into the quick coupler located at the upper left corner of the sub frame. Ensure that the Quick Coupler Connection is properly secured. Failure in this connection will result in damage to your equipment. Quick Coupler Rev. 01 – 07/09/08 4 New Holland Combine Reservoir Integration 10. Refill the hydraulic reservoir as described in your combine operator’s manual. 11. Check all new hydraulic connections for leaks. Do Not use your bare hands to check for leaks, use a piece of cardboard as high pressure hydraulic fluid can penetrate your skin. Ensure the reel return quick coupler is securely connected to the hydraulic pump. Failure in this connection will also result in damage to your equipment. Pump Quick Coupler 12. Test your table to ensure everything is working correctly. Rev. 01 – 07/09/08 5 …